
Our Guide to Successful Long Table Runner Cakes

Our first table runner cake was actually a 100 foot long cake to celebrate the 100th anniversary of the Ross School of Business in August 2024.
In order to execute an order like that, we had to create systems to ensure our team could size, bake, decorate, cool and deliver a cake of that scale.

The Sweet Heather Anne team created this 100 foot long cake to celebrate the Ross School of Business’ 100th anniversary!
The table runner cakes that we have been making for weddings are a bit smaller, but the repetition has helped us improve our systems even more.
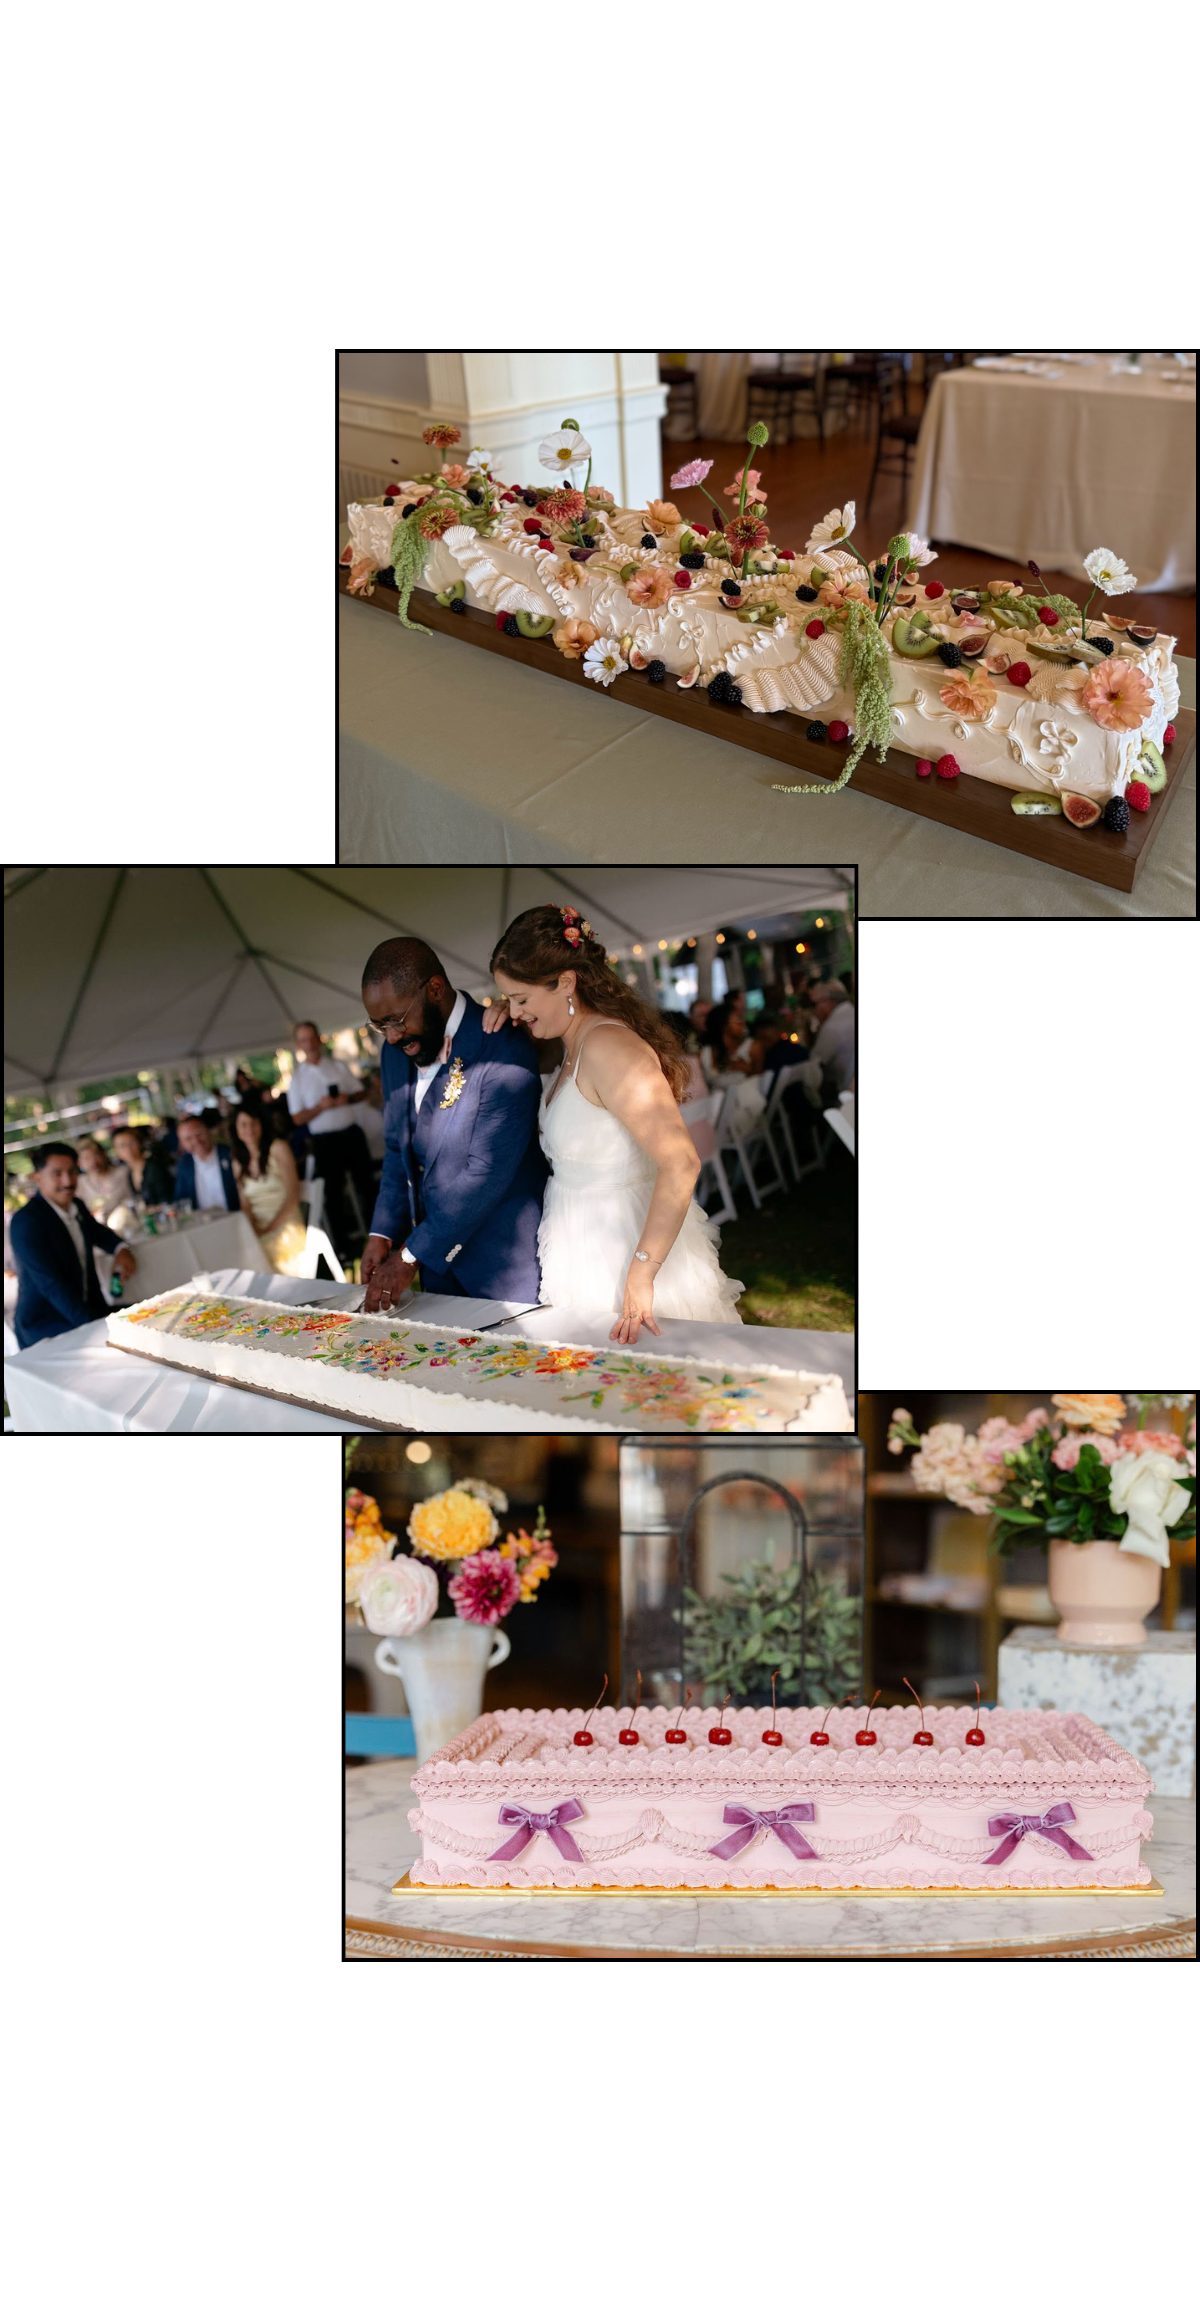
Three unique styles of long, table runner cakes designed and baked by Sweet Heather Anne.
Middle Photo by Justine Montigny
Bottom Photo by Cat Carty Buswell
Here’s a guide to everything we’ve learned so far:
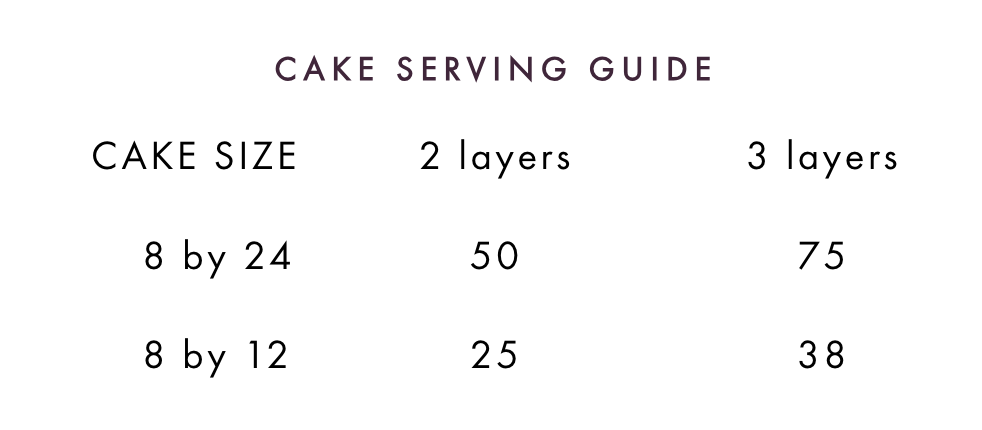
1. Sizing
My favorite way to make long cakes is to bake individual layers of cake in full sheet pans and then cut each layer into two long slabs that are approximately 8 inches by 24 inches once they’ve cooled. If you don’t have the space to store that large of a cake, you could also use ½ sheet pans and cut them into 8 inch by 12 inch layers.
Depending on the design of the cake, we use 2 to three layers of cake. We find that cakes with vintage piping look best with three layers so that you have enough space on the side for decoration.
To get to the number of servings that you need, just link the cakes side by side. For example, the 150 serving painted buttercream cake that we made was 6 feet long and executed in 3 2-foot sections.
2. Sourcing Long Cake Boards
When we needed to source the boards for the 100 foot cake, we worked with Sturdy Boards to make custom 10 inch by 24 inch cake boards. If you want to go this route, note that the lead time for a custom order is 4-6 months.
Since then, we’ve started preferring to use these shelves from Home Depot. They come in a variety of colors and they are sturdier than the Sturdy Boards we were using, allowing us to transport the cakes easily and avoid cracking in our swiss meringue buttercream.
If you decide to use the shelves, make sure to create a barrier between the cake and the shelf with a waxed cake board cut to the exact size of the cake before it has been iced.
Example of wooden shelves from Home Depot
3. Tips for Baking and Building Long Cakes
Line the bottom of your pan with parchment paper so it is easier to cut and transfer the large slabs. See above for pan sizing.
When baking the cake layers, make sure to rotate them just before they set so that they bake as evenly as possible.
For particularly soft cakes, freeze the cake layers and cut and assemble the cake when they are partially thawed.
Make sure all of the sections of cake are lined up in the middle of the cake board and use a ruler to make sure the cakes are the same height and width when you build and smooth them.
For the end pieces, cut one inch off the cake on one side so that you can see the same amount of board on the end as on the side. If your cake is 3 or more sections long, don’t cut anything off of the middle sections.
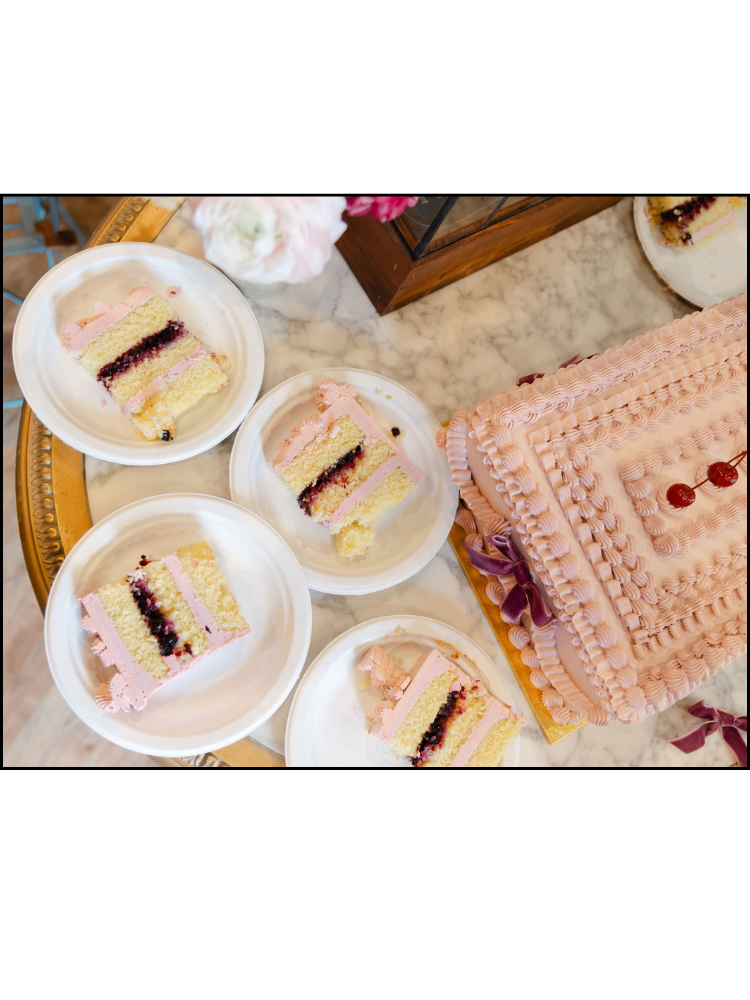
If you are doing a two-layer cake, go heavy on the fillings in the middle. If we have more than one filling we often layer both between the cake layers and then smooth the cake in vanilla buttercream in the color of our choice. If the design allows, we ice the cake in flavored buttercream.
4. Decorating Techniques
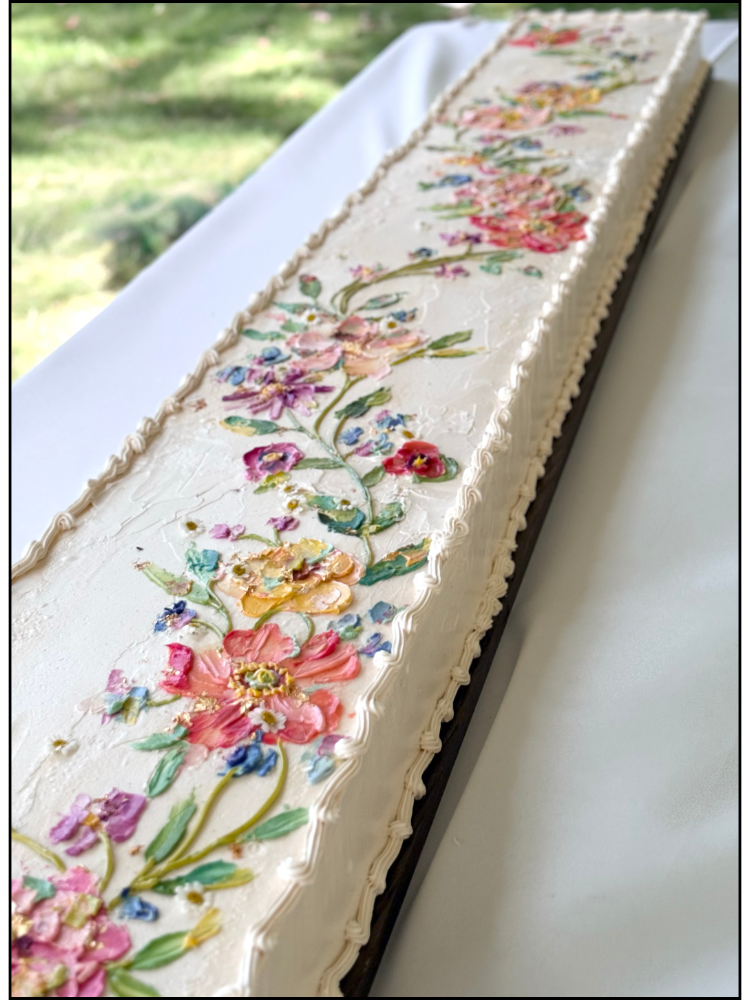
We prefer to decorate the cake in our Cake Studio and add the finishing touches on site. For the 6 foot long painted buttercream cake, I set the cake out on a 6 foot table to decorate. I finished everything I could in the cake studio, including most of the borders on the cake. I left some places a bit more sparse so that we could seamlessly fit the cake together on site.
For vintage cakes, I like to work the seams of the cake into the design. That way, you’ll be able to easily pipe details over the seams upon delivery.
If I can’t pipe over the seams, I like to have a slight texture on the cake. With swiss meringue buttercream, it would be very difficult to put cake layers together on site and make the seams perfectly smooth.

Example of a piped detail that is great for covering seams!
5. Storing Long Cake Pieces
We have a walk-in refrigerator, so it is easy to store sections of the cake on full sheet pans in our walk-in.
If you don’t have access to a walk-in, I’d recommend measuring the space you do have and adjusting the length of your cake sections so that you can refrigerate them.
6. Facilitating A Smooth Delivery
Transport the chilled cake layers on a flat surface in an air conditioned vehicle. For the 100 foot cake, we had 6 delivery vehicles and we still had to take two trips!
If you are using a custom Sturdy Board, put a wooden shelf underneath the cake and stick them together with sticky mats or tape so that the cake does not bend.
Once on site, ensure that the cake isn’t in direct sunlight. You don’t want to move this cake once you’ve added the finishing touches!
Center the cake on the table. If the cake is particularly long, a ruler can help with this. When we were assembling the 100 foot cake we didn’t realize how difficult it would be to center the cake in the middle of the table and it ended up looking a little wonky even after our best efforts.
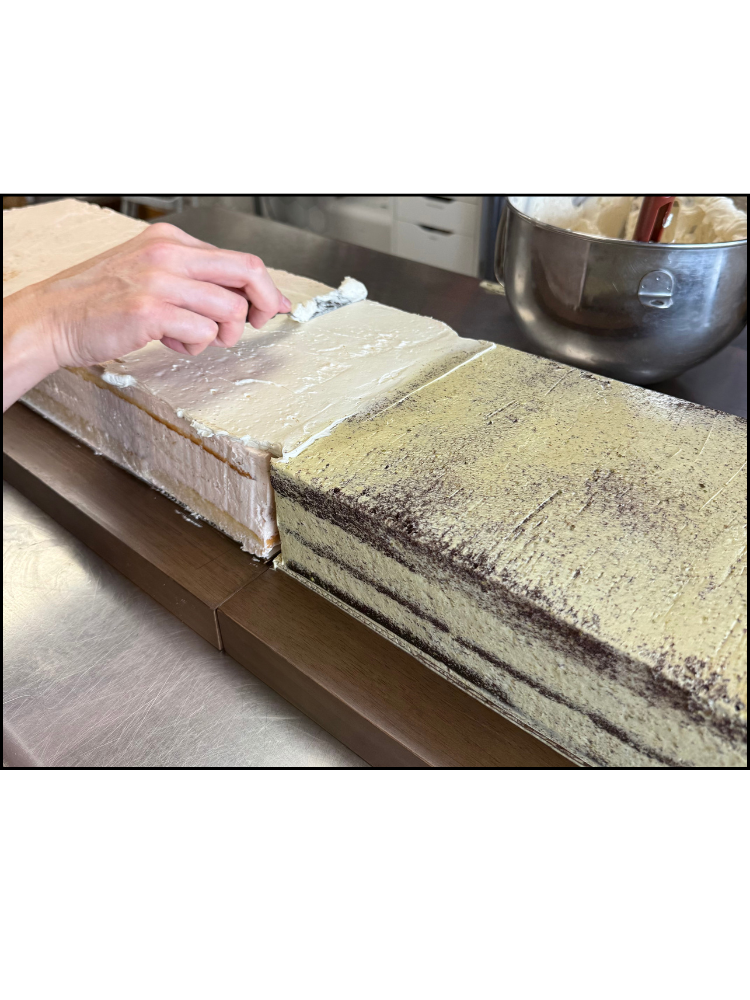
Filling the seams will look different depending on the design. I recommend bringing a piping bag with a large round tip to fill the seams and then smoothing the buttercream with an offset spatula, a cake scraper, or your decorating tool of choice. We love these mini cake scrapers for finishing seams.
Look at the cake as a whole and add whatever finishing touches you need to create the illusion that it is one long cake with no seams. Make sure to bring whatever supplies you need to make that happen.
7. Fusing Trending and Personal Styles
I mentioned in our 2025 cake trend predictions that this was a style that we were excited to put our own spin on. Pallet knife painting is one of our favorite decorating techniques, and it translated amazingly to this style of cake.
If you have a decorating style that feels like your own, I’d encourage you to try it on this long cake format. I can see everything from buttercream flowers to piped embroidery looking stunning on a table runner cake.
As with any trend, there is a lot of room for experimentation. I can’t wait to see what you make!

Cakes and content by: Sweet Heather Anne
